Sunday, March 31, 2013

My new favorite recipe: Power enchiladas

I just discovered a new favorite recipe for phenomenally-delicious and HEALTHY enchiladas, which is huge since I love love LOVE Mexican food... One bite of these enchiladas and I was in heaven... It was hard to believe that one of these enchiladas was roughly 250 calories!!!!


But it's true!

The only thing I'd do different next time is make my own enchilada sauce instead of using a canned version, but in the interest of time, the canned version did just nicely... and honestly, I was just so happy to have a tasty Mexican dish (did I mention that I LOVE MEXICAN) that was low in calorie that I could "splurge" on without the actual caloric splurge... I'd do it again.  And again.  I will make this recipe again!!!

Here's how I made it:


Start off by chopping the onion and green pepper, and saute them in a bit of canola oil and chicken broth...


...meanwhile, grate the zucchini...


...and when the onion and green pepper are cooked, add the grated zucchini...


...meanwhile, shred the cooked chicken...


...chop the cilantro...


...add veggies and chicken in a large bowl, and mix well...


...then add cilantro and green chiles and mix well...


...then add half the cheese and mix well...


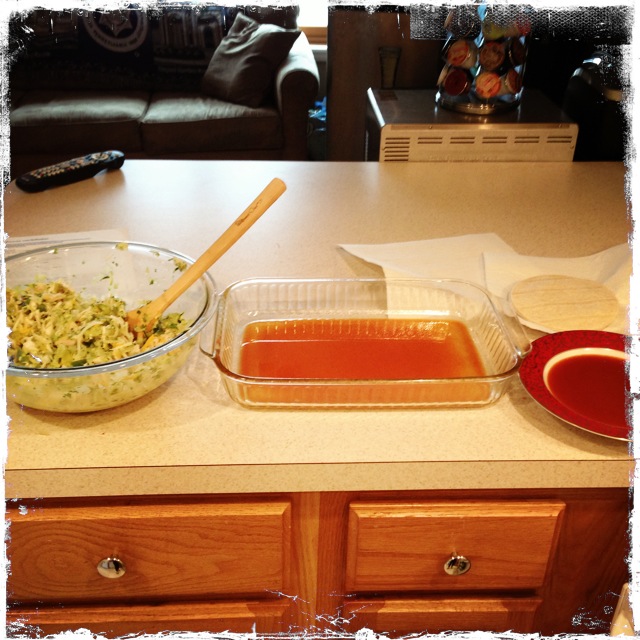
...now, set up the baking dish by pouring enough enchilada sauce into a 11x17 that has been sprayed with baking spray, pour remaining sauce into a bowl, and get ready to start rolling the enchiladas...


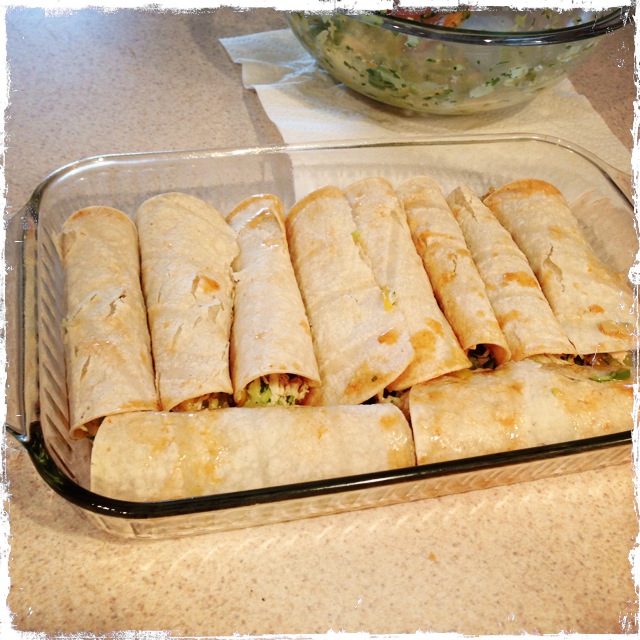
...dip one side of the tortilla into the enchilada sauce, then stuff with the veggie/cheese/chicken mixture, roll into a tortilla, and then put into the baking dish, seam side down...


...until you've rolled them all!!


...pour any remaining enchilada sauce over the enchiladas...


...and then top with the remaining cheese...


...cover with foil and put in the oven...


...after 12 minutes, remove foil and keep baking for another 10 minutes...


...take out and admire the melted cheesy goodness...


...plate...


...top with a bit of sour cream if you wish...


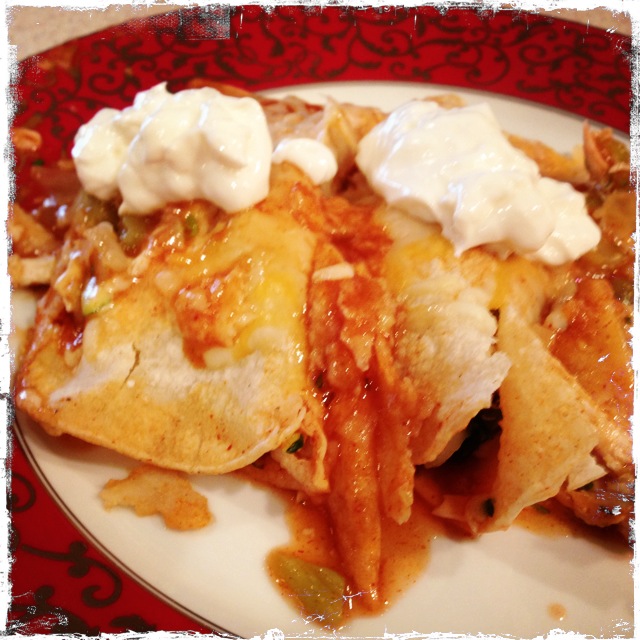
...and INHALE.  That's all you can with these amazingess.  Is just inhale the delicious goodness...


Here's the full recipe!!!

Power enchiladas
Slightly modified from Muscle and Fitness Hers

Serves 8-10
1 cup chopped onion
1/2 cup chopped green bell peppers
1 Tbsp. canola oil
4 oz. fat-free chicken broth
1 cup grated zucchini (about 1 small zucchini)
2 cups shredded, cooked skinless organic chicken breast
2 Tbsp. chopped cilantro
3-oz. can chopped green chili peppers
1 tsp. garlic powder
11/2 cups grated reduced-fat Monterey Jack cheese, divided
15-oz. can red enchilada sauce, divided
8 small corn tortillas
1/2 cup light sour cream (optional)
Nonstick cooking spray

Directions
1. Preheat oven to 350 degrees F.
2. Cook chicken and shred
3. Over medium-high heat, saute onion and bell peppers in canola oil and chicken broth for about five minutes. Add zucchini and saute for about three minutes or until just cooked. Remove from heat and pour off any excess liquid.
4. In a large bowl, combine chicken and vegetable mixture. Add cilantro, green chili peppers and garlic powder. Mix thoroughly. Stir in 1 cup of grated cheese.
5. Layer about 1/2 cup of enchilada sauce on the bottom of an 11x17-inch shallow baking dish coated with nonstick cooking spray. Pour remaining enchilada sauce into a large bowl.
6. Dip a tortilla into the bowl of enchilada sauce until it's completely coated on one side. Then fill with two large spoonfuls of the chicken-vegetable-cheese mixture. Roll tortilla into a tube and place in baking dish, seam side down. Continue dipping and filling tortillas, and place each tortilla in baking dish so they touch.
7. Top enchiladas with remaining sauce and cheese.
8. Cover baking dish loosely with foil and bake 12-15 minutes. Remove foil and bake 10 minutes more. To serve, garnish with light sour cream if desired.
9. Devour. Enjoy. Share the love with others.

NUTRITION FACTS (per enchilada): 254 calories, 21.7 g protein, 19.7 g carbs, 9.8 g fat

Monday, March 25, 2013

#25 Take a writing class

So I write for my job.  A lot.  And I obviously write this blog.  I attempt to make it interesting for you dear readers, but honestly, am I? Who the hell knows.

So #25 Take a writing class on my bucket list was an opportunity to gain perspective, and even reassurance, that I can write, and write well. Ultimately though, I wanted to learn how to be better...

So I signed up for a class to see if I could hack it.

Here are my thoughts on the experience.

I LOVED IT.

I loved my class.  I loved my fellow classmates.  And I loved my instructor. 

I learned so much... and I learned how to take my writing to the next level.

Now... it didn't start out as love.  It was pretty nerve wracking.  I felt like an amateur for the first four weeks, and felt like I wasn't as good as my colleagues.  

Everyone else in the class was a "literary" writer, with creative, flowery language... and it was BEAUTIFUL.  I was impressed with their insight and style... And my style was more simple, more "service" oriented in that I'm less beautiful language and more "Here's my experience." 

So I'm different.  And you know what?  THAT'S OK.  I'm not worse, I'm just different.  Again, that's OK.  Accept yourself, Kim, accept who you are and EMBRACE you. 

The other amazing aspect of class was reading my classmates work, and providing constructive feedback: one thing we loved, and one thing we felt needed more love... When it was my turn to be critiqued, I was so nervous, but the feedback I received was soooo incredibly helpful, and in such a supportive environment. 
So, at the end of the 10 weeks, I realized a few things:
1. It's OK to have a different style.  Own you.
2. My first drafts suck, but they suck for everyone (apparently), and every draft goes through multiple revisions.  Keep trucking.
3. I kinda wanted it to go on forever. Embrace.

Now, what class should I take next??? :)  Maybe blogging, memoir, or perhaps romance writing???


Friday, March 22, 2013

Chicken and zucchini balls

Balls are good.  (Snicker... yes, I'm an teenager trapped in an adult's body...)

Especially when they are composed of ground chicken and shredded zucchini.  Because those two ingredients make these meatballs healthy, and y'all know how much I love healthy :)

An extra special bonus is that I was able to feed my buddy Justin my balls... and he complemented me on them: "I love your balls."  Yes, Justin is also a teenager trapped in an adult's body ha!

These Baked chicken and zucchini balls are so easy to prepare: shredded zucchini, ground meat, chopped onions, an egg, some fresh herbs, voila.  A super easy recipe that is moist, tasty, and healthy...


 Here's how I made them:


Start by shredding a zucchini...

...then finely chop an onion and the fresh herbs...


....add to a bowl...


....add chicken, an egg white, a dry herbs, then using your hands, mix to combine...


...line a baking sheet with fool, spray with cooking spray, form the balls, place on foil-lined pan, and bake...


...then devour.  For a tasty, tangy sauce, combine greek yogurt and dijon mustard in equal parts...

The full recipe is below:

Baked Chicken Zucchini Balls
Recipe courtesy of The Iron You
Makes 22 meatballs
Ingredients
1 lb ground organic chicken
1 large (or 2 small) zucchini, grated
1 medium onion, finely chopped
2 egg whites (or 1 large egg)
2 tablespoons mint, chopped
2 tablespoons parsley, chopped
 1 teaspoon fine grain sea salt
½ teaspoon cayenne pepper
½ teaspoon black pepper
1-2 teaspoons turmeric

Directions

  1. Preheat oven to 400°F (200°C) with a rack in the upper third of the oven. Line a baking sheet with foil.
  2. In a large bowl, using your hands, combine all the ingredients, mixing well 
  3. Form balls (roughly one tablespoon of the mixture) and place on baking sheet. 
  4. Bake for ~20 minutes or until balls are cooked through...
  5. ENJOY.

Monday, March 18, 2013

Seared sea scallops, tomatoes and peas in a creamy saffron sauce

Ummm... yum!!!


That's what my mouth said with each amazing bite of a new dish I found on Pinterest, Seared sea scallops, tomatoes and peas in a creamy saffron sauce... yumminess, and creaminess, and deliciousness, and love... and also a heart attack.  But that's OK, because I enjoyed every calorie!  (My next challenge?  How to make it healthier!)

It starts with olive oil and butter:


Add scallops, season with salt and pepper:


...and sear until a nice golden brown crust forms (about 2-3 minutes per side), remove to a plate...


Next, in the same pan, start the sauce... by adding the sliced tomatoes...


...and then add the white wine to de-glaze the pan and allow it to cook off until about half of the wine remains. Don't forget to take your wooden spoon and scrape any bits from the bottom of the pan...


...turn the heat down, add peas, more butter and finally, the cream... stir...


...when combined, then add the saffron threads... and then return the scallops to the pan to coat in the delicious sauce, and then plate, immediately...


...and oh, what a gorgeous plate it is...


....but not as gorgeous as how it tastes!!! Savor the rich, creamy, tangy and smoky flavors... enjoy the perfectly seared scallops... enjoy the fresh bright peas and the warmed tomatoes, and of course, that phenomenal creamy, wine saffron sauce... SO delicious!!!

Here's the full recipe, which is slightly adapted from bell'alimento

Sea scallops, tomatoes and peas in a creamy saffron sauce

Ingredients:
  • 6 tablespoons unsalted butter - divided
  • 2 tablespoons extra virgin olive oil
  • 12 large sea scallops - patted dry
  • 1 cup dry white wine 
  • 2-4 Roma tomatoes, sliced into 1/4 inch thick slices and halved
  • 1 cup frozen green peas, cooked according to package instructions
  • 2 tablespoons heavy whipping cream
  • pinch of saffron threads
What To Do:
  1. Into a nonstick pan, melt 2 tablespoons butter and olive oil. Add scallops. Season tops with salt and sear well on both sides, about 2-3 minutes per side. Careful to turn only once {you don't want scallops to tear} Remove scallops from pan and keep warm.
  2. Add tomatoes to hot pan, then add wine to hot pan and de-glaze pan. Reduce temperature to medium - low and allow wine to reduce by half. Add peas, cream, remaining butter and allow to combine. Once butter has combined, add saffron threads. Stir well to combine.
  3. Return scallops to pan. Turn to coat. Serve immediately and DEVOUR.

Tuesday, March 12, 2013

#10 Do the Insanity 60 day challenge

You know when you hear people doing something crazy like P90X and Insanity, and they're all like "Yeah, I'm P90X'ing, man, so tough," and you just nod your head even though you have no clue what the heck they mean?  Yeah, me too.  Until my brother in law bullied (haha not really, but it sounds more dramatic if I say bullied) me into joining him with doing Insanity.

So #10 "Do the Insanity 60 day challenge" is all because of my brother (in law), Diego.

 
Now, I have always been active, but I can get bored pretty easy, so let's just say that my fitness routine is random and sporadic.  I get into something for a few weeks and it's all I want to do, and then I get bored and stop doing it, until a few weeks later I get interested into something else.  I need someone like Jillian Michael's to yell at me to keep me going.

And Insanity sure delivered. Days 1 - 8 Kicked. My. Ass.  As a cardio-freak, I really don't do weight lifting, so my upper body was brutalized, but so were my legs!!  Days 9+ weren't that easy, either, but at least by then I was hooked and motivated, because I already started to see improvement and feel better! 

I definitely hated one of the videos - Plyometric Cardio - the first 10 times I did it... but what fascinates me is that the more I did it, the better I got at it, and now, it's one of my favorites!

Now, I'm NOT a morning person.  At all.  Ask my family if you have any doubts, but there is nothing nice about me in the morning.  I can hit the snooze button hundreds of times (and in fact, I almost tried to quit snoozing for my 30 by 30 challenge)...but I knew that, if I were to follow the 60 day plan, I needed to do it in the morning before the after work distractions (late nights at the office, happy hour, bottle of wine, etc...) grabbed my attention... So I created different tactics (such as multiple alarms with different ring tones) and enlisted the help of some awesome people, such as my brother-in-law and a new workout buddy, Sora.

My alarms, complete with motivational settings and motivational songs:

  • 6:42am: J Lo's "On the Floor"
  • 6:44am: Republica's "Ready to Go"
  • 6:46am: Madonna's "Jump"
  • 6:48am: David Guetta and Akon "Sexy Bitch"
Photos that Diego and I traded after we had completed our morning workout:

Day One, dying...

Day Six, abs screaming!

Day 15, FEELING GOOD, yet still working hard...
And it worked, for a little bit.  I got through 18 days before I took a break due to a variety of excuses (my nephew's birth, I got sick and took a week off), etc...

I tracked my progress... until I stopped :)
So I decided to start again, this time with my mantra "If you're tired of starting over, stop giving up."


And I decided that the scheduled 6 days of workouts in a row was not healthy for me... I was exhausted, and felt that might have contributed to getting sick around Day 18... so I decided to do 2 days on, one day rest.  And it took me over 90 days to complete the 63 day plan, but I tried to stick with it, even if I took off a week here and there due to life (traveling for work, the holidays, etc.)


Feeling successful around Day 35...
The result?  I felt myself getting stronger, having more endurance, being able to do more pushups and power jumps... but my body didn't change (much), and I didn't lose weight... which was not really the goal, but let's be real here... every girl is looking to lose weight :)

Doing Cardio Abs, with Teddy :)
And I learned a LOT from my BeachBody coach, Katelyn - creating a "why list", continuously renewing your motivation, seeking help from those around you, believing in yourself... all the good life lessons that I want to continue utilizing!

Have you tried Insanity?  What about Shaun T's newest programs?  Any other Beachbody programs?

Sunday, March 3, 2013

#16 Learn how to fly a helicopter

Groupon and LivingSocial have improved my life... in an eye-opening "Hey, I didn't know that even existed!" way.  This post, #16 Learn how to fly a helicopter, is all thanks to Groupon and LivingSocial. Without their daily emails telling me about discounts on a variety of amazing activities, I would have never known taking a helicopter lesson was even a possibility!

And even though it may seem like a random thing to do, I figured it couldn't hurt to learn how to fly a helicopter, right?  What if something happens and the only mode of transportation is a helicopter and you're the only one who knows how to actually fly it?!?!  Because that would TOTALLY happen one day.  Totally.


So, I knew, for the good of mankind, or at least my future fellow passengers, I needed to learn how to fly a helicopter.  Without further ado, here's what it was like!!!

First, it was a surreal experience. The time flew when I was flying... seriously 25 minutes felt like it was half a minute.

Second, I realized that I have a habit of signing my life away... (Remember my skydiving adventure?) This was no exception... I signed my life away again... I wonder if I should be concerned?!?  HA!

Third, the instruction for how to fly the helicopter took all of 20 minutes.  Now, that doesn't mean that I can fly a helicopter by myself.  No, not at all.  But, it did give me the basics to be able to steer the aircraft while in the air... But know that flying a helicopter is a full body experience...

One of the instructors telling us how a helicopter works...
Fourth, helicopters are expensive. We flew an R22, which is a very small copter (they kept calling it a "ship"), that costs $316,000.... More than a Ferrari! There are the blades on top and blades at back, which control various features...

So, after the 20 minute presentation, I was given a "boarding pass"


...and then I was loaded into the helicopter...


...put on a headset, surrendered my boarding passes...


...And then we were off.  We hovered above the ground about five feet maybe, and "taxied" like an airplane to the runway of the Linden Airport and took off as if we were an airplane... Of course we could have just gone straight up, but since it is an active airport, they did it this way. 


The helicopter has huge windows, so you have an amazing view of what's happening in front of you. Linden is close to Newark, so the view isn't really that great, mostly rivers, bridges, highways, but still - you're in a freaking helicopter and I didn't care if what I was looking at was the Taj Mahal or a freaking highway... 

My instructor, Morgan, was monitoring everything, working the pedals with his feet.  When sitting in the cockpit, you have the throttle on the side of your seat, a governor in the middle, and the steering wheel can be moved back and forth between you and the pilot.


So once we got up, Morgan moved the steering wheel to me, and I started to fly the helicopter!  You hold the steering wheel in between your legs with your right hand, and just like you're trying to keep a car in the middle of your own lane while driving, you use light movements to fly a helicopter.  I steered toward a smokestack, and then took a right to fly down a river, over a few tank ships.

I flew for about five minutes, and my arm got tired, so then I turned it back to Morgan, my instructor, and enjoyed the rest of the ride and sights.

It was over too quick, I could have stayed up in the air seeing the sights forever... It was cool to experience seeing what a pilot sees - all the various instruments, and the three gears that you constantly are working (I only worked the one, which was plenty enough for me!)

To celebrate being alive and not crashing a $300,000 machine, I met my awesome roommate at our favorite bar, Texas Arizona, for a burger and a beer :)


Oh, and I also received a certificate of flight training that is FAA certified and counts towards the 40 hours needed to get a helicopter pilot license!!!


...which makes me want to continue taking lessons... I mean, why not?!? :)